Social Website Tutorial (v0.9)
Overview
This document serves as a complementary tutorial to the /wiki/spaces/a/pages/527151 where an OpenSocial "Gifts" gadget application is demonstrated with OpenSocial version 0.9 features. While this tutorial demonstrates the exact same "Gifts" application to the end user, it will instead be constructed entirely from server-side technologies including the OpenSocial REST/RPC protocols and OAuth.
Why is this tutorial significant?
With the technology presented in this tutorial, any website can offer integration capabilities with any social network site that supports OpenSocial. This opens up a number of rich possibilities where you could have the option of combining any online experience with your connected friends, family and/or colleagues. Some obvious examples include shopping, travel planning, and news sites, all of which can offer rich and compelling social features such as sharing online coupons with friends, sharing travel plans with colleagues etc.
Ultimately the technology presented in this tutorial actually expands the definition of OpenSocial applications in that they no longer need to be exclusively built using gadget technology and operate within a single OpenSocial container. Instead they can be fully independent of any one OpenSocial container and be built with a variety of server-side technologies and languages. Literally any website can now become an OpenSocial application if it uses the server-side technology presented in this tutorial!
In order to provide the clearest path on how social features can be added to a server-side web application, this tutorial takes a takes a well-known, existing, gadget-based application, and then reverse engineers it into an entirely server based application using OAuth and OpenSocial REST/RPC technologies.
This tutorial is broken down into the following core sections:
- Defining the requirements for a web app version of the OpenSocial 'Gifts' App
- Implementing the feature requirements for a web app version of the OpenSocial 'Gifts' App
- Summary
Defining the requirements for a web app version of the OpenSocial 'Gifts' App
If you recall from the /wiki/spaces/a/pages/527151, the application itself is very simple in that it displays a collection of gifts and a list of friends (from a social network) in HTML dropdown lists. It also supports a gift giving operation, and displays all of the gifts given/received so far for the user.
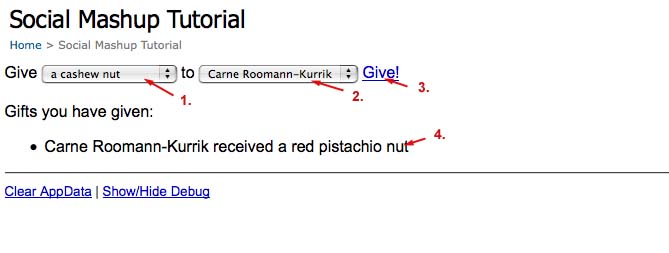
Figure 1: Defining the requirements for our example gifts application
So to review, the key requirements of the application are as follows:
- Display a list of gifts and display in an HTML select dropdown list.
- Display a list of friends from an OpenSocial container, also in an HTML select dropdown list.
- Implement a gift giving feature where a user can give a gift to a friend.
- Display the gift transactions related to the user.
As you can see from requirement #2, secured communication with an OpenSocial container will be required. In order to securely access this social data from a container, 3-legged OAuth will be employed and will allow the user to redirect to the OpenSocial container, provide his/her credentials, and then return to gift app with authorization from then on to securely access the container for social data requests.
Let's break these requirements down one by one and discuss how these can be implemented in a server-side web application.
Implementing the feature requirements for a web app version of the OpenSocial 'Gifts' App
Feature #1: Displaying a list of gifts
In the existing /wiki/spaces/a/pages/527151, the gifts dropdown list is generated from data obtained from a JSON feed. This same exact method can be used in a server-side web app, where a fetch is done to retrieve the data from the web, parse it and place it into an HTML dropdown list. Since this action does not really involve any OpenSocial technology, we won't go into this in detail other than that it is fairly easy to download any of a number of server-side JSON libraries from http://json.org in order to fetch and parse JSON streams to populate an HTML dropdown list.
Alternatively, since most webapps usually have a backend SQL database, the more common pattern would be to place the gift data into a local database and then use this local data to generate the gift drop down list. This alternative method is also not related to OpenSocial so we won't review this approach, but there are numerous examples and tutorials on using databases such as MySQL in webapps available on the web. For users of Google App Engine, this is also a very easy task in that all that is required is to create an App Engine Data Store object "Gifts" and query this object to generate the drop down list.
Feature # 2: Retrieving a set of friends from OpenSocial container and displaying in dropdown list
The second feature in our Gifts application is the key feature that we'll be reviewing how to build in detail, as it requires connecting to an OpenSocial container and then fetching a list of friends of the person viewing the application. To achieve this in a secure manner, 3-legged OAuth is employed. (For supplementary reading, a tutorial which explains general OAuth concepts and usages are explained in the OAuth Use Cases document.)
At this point we should consider the differences between running the original Social Mashup Tutorial application within a single container, and an independent website that is making a connection to a container. First, when you are viewing an application within a container, you have already established your identity by successfully logging into the container/social network itself and all subsequent viewing of applications will be done through the context that you have logged in and are securely connected. Another caveat, or difference from a standalone webapp is that you are only logged into a single container/social site, whereas with an independent web application, it is possible to interact with multiple social sites. So taking this into account, we will build our web application with the following capabilities:
- In order to make a secure connection to an OpenSocial container, we will use 3-legged OAuth.
- Since our social website is independent of social container site(s), we will allow users to pick from a list of social sites from which to fetch social data from. In this case we'll offer options to log in to MySpace, Google and Partuza. (For those unfamiliar with Partuza, it serves as a reference implementation of a runnable social website that implements OpenSocial.)
To enable the option to select from a list of social containers, we will create a login page where you can select from a set of actual OpenSocial containers (MySpace, Google and Partuza). After selecting which site you wish to authenticate with, you will then be passed on to the selected site where you will be allowed to login with your credentials on this site. Once you've satisfied the container site's credentials, you will be redirected back to the tutorial site, but this time with the necessary security access so the site can then make additional REST/RPC requests to fetch social data. In our case after the request has been granted, we are redirected to our main page's site where we see the familiar gift giving page but with the list of friends coming from the OpenSocial container populating the dropdown list. Figure 2 illustrates this flow:
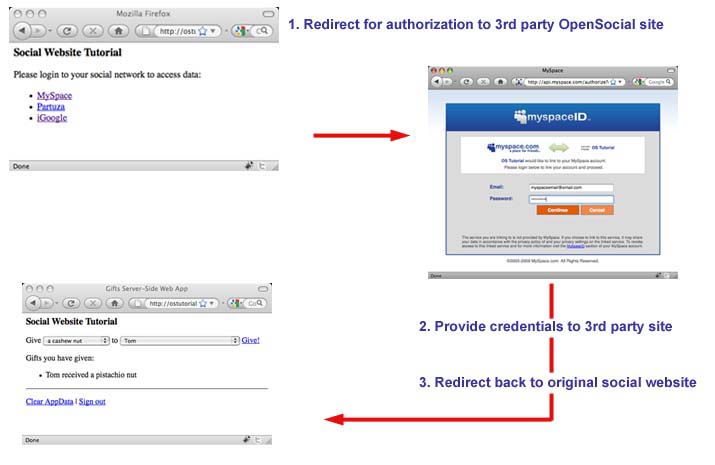
Figure 2: The end user's page flow used in our example application
As you can see from figure 2, the transfer from our gift webapp to the OpenSocial site containing the social data, and transfer back again is done in a simple, unobtrusive way so as to not interrupt the end user's experience. They simply have to verify that it is ok to retrieve social data from the OpenSocial site that they select (step 1). Once they have verified that this communication is possible by providing the necessary login credentials on the 3rd party site (step 2), they are redirected back to the original site (step 3). This stepping out to a 3rd party OpenSocial container to get authorized access to social data is known as "doing the dance" since it requires negotiating (or "dancing") with a third party for access to secured social data. The dance is simplified if the user is already logged into their favorite social network, no extra login step is required, they are just presented with a confirmation screen to allow access.
Now that we have a feel for what it is like to step through a 3-legged OAuth transaction from an end user's point of view, let's now examine what is happening under the hood with 3-legged OAuth that makes this dance possible.
Examining the 3-legged OAuth transaction in our application more closely
As you saw in Figure 2, the end user experience is rather simple, they simply have to provide credentials once to enable the calling website (our gifts webapp) access to social data from the container. Under the hood it is actually a little more complex, as a few more transactions are required. Figure 3 illustrates the different steps required:
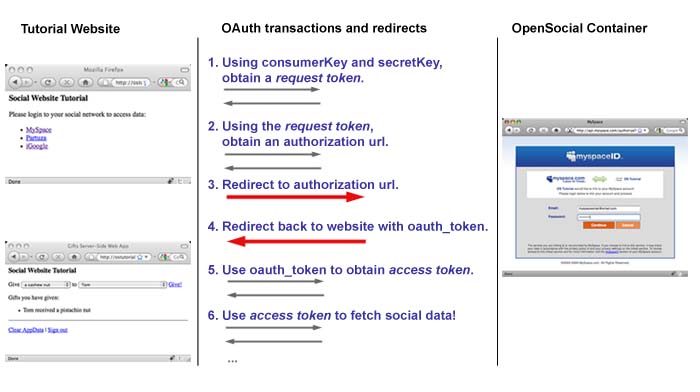
Figure 3: A more detailed view of the OAuth transactions and redirects used in this example
You can see in detail, in Figure 3, the actual transactions between the website and OpenSocial container: where the tokens are requested before and after an actual website redirect (navigation) occur. We'll step through the exact code required for these OAuth transactions shortly, but first, here are two key requirements that you need to fulfill before you can successfully perform OAuth transactions on a server.
Getting familiar with the OpenSocial Client Libraries
The first requirement before doing OAuth transactions is to get familiar with the OpenSocial client libraries. Although it is possible to directly download utilities and code samples from oauth.net to perform secured OAuth transactions, it is much easier to use the OpenSocial client libraries since they bundle the OAuth utilities along with OpenSocial-specific classes and helpers. In our tutorial example, we'll use Java and the OpenSocial client libraries to perform secured OAuth transactions, but the concepts shown will be applicable for any language where OAuth is supported.
Details on how to set up and use the OpenSocial Java client libraries can be found at the Java client library project hosted on Google code. Specific details on how to configure the client libraries within a Java web application are defined in this 2-legged OAuth tutorial posted on the OpenSocial Java client library site. Note: The Java webapp configuration for 2-legged and 3-legged are exactly the same.
Obtaining OAuth keys
The second requirement before making an OAuth request is to obtain two specific items from the OpenSocial container site. These are:
- OAuth Consumer Key
- OAuth Secret Key
These keys are what allow you to be in a position to request access at all and without these keys, your site can not even begin to request access to the site's secured social data. Obtaining these keys requires consulting the documentation for whichever site you require access to as they all handle distribution of this data in different manners. For example with MySpace, you have to first have a developer account on developer.myspace.com and then you must create a new application (of type "MySpace ID") and have it approved by MySpace in order to obtain workable OAuth consumer and secret keys. (For more details on creating MySpace ID applications and obtaining OAuth keys from MySpace, consult their documentation at: http://wiki.developer.myspace.com/index.php?title=Main_Page ).
To obtain OAuth keys from other sites such as Google and Partuza, consult the following sites:
- http://code.google.com/apis/accounts/docs/OAuth.html - Instructions for registering your app and obtaining OAuth keys for Google's sites.
- http://www.partuza.nl - You'll need to first register for an account on this site. To find your OAuth consumer and secret key, you can click to edit your profile and then click on the OAuth tab.
Now that you have the initial keys from which to begin requests to an OAuth secured OpenSocial container, you'll need to have a way to actually make this request. While it is possible to write code on your own that both uses libraries from the OAuth directly (obtained from OAuth.net) as well as your own code that adheres to the OpenSocial REST/RPC spec, the much simpler route is to use one of the OpenSocial client libraries explained earlier in this tutorial since they have the code for making OAuth requests built-in.
Making an OAuth request
Now that we have both the consumer and secret keys, there's one more bit of information that we need. That is, we need the correct location of the container's REST/RPC endpoints. These endpoints are also typically found in the documentation of the container sites, but fortunately if we are using one of the OpenSocial client libraries, the endpoint information is already provided for us. In the cases of the Java client library we simply create a class of type: org.opensocial.client.OpenSocialProvider as in:
OpenSocialProvider provider = OpenSocialProvider.valueOf("MYSPACE");
The 'provider' class is then used in subsequent communications with the OpenSocial container. Incidentally, the "MySpace" provider is hardcoded as a Java enumerated type into the class itself as:
  ...
 MYSPACE("http://api.myspace.com/request_token",
   "http://api.myspace.com/authorize",
   "http://api.myspace.com/access_token",
   "http://api.myspace.com/v2", null, "MySpace",
   BodySigningMethod.SIGN_BODY_HASH, true),
 ...
Now with our OAuth keys and provider information saved into variable secretKey, consumerKey and provider, we can make our first OAuth request of the OpenSocial container where we are requesting a "request token". The following Java code using the OpenSocial Java client library achieves this:
final OpenSocialClient client = new OpenSocialClient(provider);

 client.setProperty(OpenSocialClient.Property.CONSUMER_SECRET, secretKey);
 client.setProperty(OpenSocialClient.Property.CONSUMER_KEY, consumerKey);

 try {
 Token token = OpenSocialOAuthClient.'''getRequestToken'''(client, provider);
 ...}
After receiving the request token we can then store the request token's secret field onto the session for later usage. Next we can request an authorization url which we can then redirect our user along with the original request token. Here's the complete code that first obtains the request token and then fetches the authorization url with a final redirection to the OpenSocial site.
try {
   Token token = OpenSocialOAuthClient.'''getRequestToken'''(client, provider);
   session.setAttribute("token_secret", token.secret);

   String url = OpenSocialOAuthClient.'''getAuthorizationUrl'''(provider, token, AUTH_CALLBACK);
   resp.sendRedirect(url);
 }
At this point, the user is redirected to the OpenSocial container site's page where they are asked to login, or certify that it is okay for this calling application has permission to extract data from the container site. If the user grants access, then the container site will then redirect to the url that out application has provided it via "AUTH_CALLBACK". From here on out, we can now make secured calls to the OAuth container site because we now have our request token.
To extract data from the OAuth container site, we still need one more final token. This is known as the access token and the only way to obtain one is to send your request token as an argument to the OpenSocial OAuth container site.
So to review our path so far, we've just been redirected back from the OAuth container site after successfully providing login credentials and we now have our request token. Now it is time to make an actual call to the OAuth container site with our request token in order to obtain the final access token. This will allow us to then access OpenSocial social data from this site. As we return from the redirect from the OAuth container site to the url that we specified with "AUTH_CALLBACK", we would then have code to make the request for an access_token. The requestToken String is passed back from container as an http parameter as "oauth_token". The requestSecret String is the secret field of the request token that we obtained when did our first transaction with the container in requesting the request token. Here's some Java code that extracts the "oauth_token" parameter passed back from the container (which is the string value of the request token), along with the requestSecret String from the session and then uses this to request an access token from the container:
String requestToken = request.getParameter("oauth_token");
 String requestSecret =  (String) session.getAttribute("token_secret");
 Token rt = new Token(requestToken, requestSecret);
 Token at = OpenSocialOAuthClient.'''getAccessToken'''(client, provider, rt);

 String accessToken = at.token;
 String accessTokenSecret = at.secret;

 session.setAttribute("access_token", accessToken);
 session.setAttribute("access_token_secret", accessTokenSecret);

 //  Now that we have all the required tokens, set them on our client
 client.setProperty(OpenSocialClient.Property.ACCESS_TOKEN, accessToken);
 client.setProperty(OpenSocialClient.Property.ACCESS_TOKEN_SECRET, accessTokenSecret);
After setting the OpenSocial client properties, ACCESS_TOKEN (access token) and ACCESS_TOKEN_SECRET (the secret field in the access token), we can now extract social data from the OpenSocial container site using something as simple as:
OpenSocialPerson person = client.fetchPerson();
In our case, where we want to fetch the current user's friends to populate a dropdown list, we would use the more complete code snippet:
Collection friends = client.fetchFriends();
Notice that this code stores the retrieved collection of friend data into a Java Collection. We can then simply iterate through this collection to dynamically produce a dropdown list with the user's friends name. Here's the JSP code that uses the "friends" Collection object to dynamically populate an HTML drop down list.
<select id="person" name="person">
   <%
       for (OpenSocialPerson friend : friends) {
   %>

   <option value="<%= friend.getDisplayName() %>"><%= friend.getDisplayName() %></option>
   <%
      }
   %>
 </select>
To quickly review what just happened, our app first obtained the necessary tokens and set them on the OpenSocial client properties. It then made requests for both profile and friend data from the container and then used this data to dynamically generate an HTML ui.
Incidentally, if we wanted to retrieve further profile information about the current user, we could use the following:
OpenSocialPerson person = client.fetchPerson();

String viewerId = person.getId();
client.setProperty(OpenSocialClient.Property.VIEWER_ID, viewerId);
In the previous code sample, profile information of the current person using the application is fetched into an OpenSocialPerson object. The viewerId field is then explicitly fetched out of the OpenSocialPerson object using the getId( ) method. In general the OpenSocial viewerId literally defines who is viewing the application and can have ramifications on how the application behaves. When using the OpenSocial Java client libraries, the viewerId can be explicitly associated with this client user by setting the OpenSocialClient property VIEWER_ID to the current user's id fetched from the container as shown in the previous code example.
In addition to extracting the authenticated person's id who is viewing the application (viewerId) from person.getId( ), it also possible to fetch other profile information including their display name and thumbnail image using getDisplayName() and getThumbnailUrl( ) respectively. Other profile fields may also be available from OpenSocial containers, but support for other fields is based on each container's own policies.
Feature #3: Implementing a Gift Giving Feature
At this point, we have completed our usage of OpenSocial REST/RPC to obtain social data. To implement feature #3, we can use several approaches. For example to give a gift to one of your friends, you can potentially use the OpenSocial Persistence API, but a better approach would simply be to use a local persistent storage mechanism such as a SQL database because OpenSocial REST/RPC support for the Persistence API is container specific. More importantly, all access to the Persistence API would have to be done via 3-legged OAuth thus increasing the app's complexity and would most likely negatively affect performance.
As an alternative, if Google App Engine is used, one can simply create a local data store object as 'Gift' and have it contain the necessary data for giving gifts.
Here's the code that you could place on your App Engine based server to process a gift giving form post:
//Get gift parameters
 String fromperson = req.getParameter("fromperson");
 String toperson = req.getParameter("person");
 String gift = req.getParameter("gift");

 Gift newGift = new Gift(fromperson, toperson, gift);

 PersistenceManager pm = PMF.get().getPersistenceManager();
 try {
   pm.makePersistent(newGift);
 } finally {
   pm.close();
 }
Feature #4: Displaying Gift Transactions
And to display the gifts so far received and given, you could use the following App Engine DataStore (Java) code:
// Get gifts for current user using local AppEngine datastore
PersistenceManager pm = PMF.get().getPersistenceManager();

Query query = pm.newQuery(Gift.class);
query.setFilter("fromPersonId == '" + person.getDisplayName() + "'");

List gifts = (List) query.execute();
And finally to display the gifts transactions in the page, one could simply use:
<%
   if (gifts.isEmpty()) {
     out.println("You haven't given any gifts yet.");
   } else {
     out.println("Gifts you have given:");
   }
 %>
    <ul>
 <%
    for (Gift g : gifts) {
 %>
 <li><%= g.getToPersonId() %> received <%= g.getGift() %></li>

 <%
 }
 %>
   </ul>
Summary
As you have learned with this tutorial, it is possible to use the OpenSocial client libraries to enable your server-side Web apps to communicate with OpenSocial containers in order to extract and manage social data from an OpenSocial container in a secured way. You've also been shown a working example of how to use 3-legged OAuth in a simple and familiar example with all the necessary steps detailed in communicating with an OAuth enabled provider. To see a running version of this application you can go to: http://ostutorial.appspot.com/login.jsp. Note: you'll need an account on either Google, MySpace or Partuza with actual friends defined before being able to give gifts using this application.