Social Application Tutorial (v0.9)
Overview
Many apps combine social data from the OpenSocial container with application data that lives on another server on the web. This tutorial will teach you how to create a social application by walking through the implementation of a simple app. This tutorial will demonstrate how to communicate securely between the container and your application server, laying the groundwork for any social application you plan to build.
Prerequisites
- You'll need a place to host your gadget XML file and application data. This tutorial uses Google App Engine, but you can use any hosting solution as long as the gadget spec and application data are accessible from the web (e.g. not behind a firewall).
- You'll need a place to test your gadget. Most social networks provide developer sandboxes where you can try out new apps. I used the http://sandbox.orkut.com orkut sandbox while writing this tutorial.
The request flow
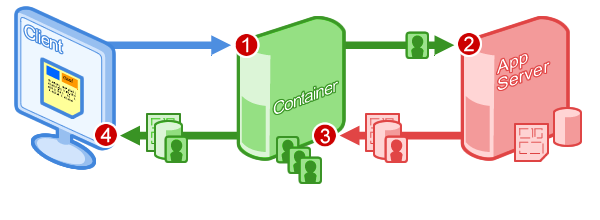
In the social application model, the container sends social data to your application server (via data pipelining) where you then render a page for the user with your existing presentation layer (via proxied content). The request flow looks like this:
- Client requests an application view
- The container sends social data to the remote server
- The remote server combines social and application data, returning HTML and JavaScript
- The container sends the content to the client
Let's start with a really simple implementation of this request flow, just to see how things work. The next two sections cover how '''proxied content''' (fetching content from your server) and '''data pipelining''' (specifying the data your app needs before it's rendered) work together to create the request flow shown above.
Fetching content from your application server
Gadget XML files normally consist of a ModulePrefs element, which defines metadata about the app, and Content elements, which include the HTML, CSS, and JavaScript to render for each view. Proxied Content allows you to specify a URL where the container can fetch the content for each view, rather than including it inline in the gadget XML file.
The following gadget XML file defines a profile view that proxies content from a URL and a canvas view that uses HTML inlined in the content section. When rendering the following gadget, the container proxies the content at http://social-app-tutorial.appspot.com/static/hello.html to display as the profile view, but simply use the inlined HTML for the canvas view.
<?xml version="1.0" encoding="UTF-8"?>
<Module>
  <ModulePrefs title="Social Application Tutorial - Proxied Content">
  </ModulePrefs>
  <Content view="profile"
           href="http://social-app-tutorial.appspot.com/static/hello.html">
  </Content>
  <Content view="canvas">
    <![CDATA[
      Hello, inlined <b>canvas</b> view!
    ]]>
  </Content>
</Module>
Adding an <href> attribute to the <Content> element is a small code change, but the ramifications are huge. Proxied content allows you to use whatever presentation layer technology you choose to render your app – no DOM manipulation or innerHTML calls in JavaScript to combine your social and application data!
A note on caching
By default, the container respects any cache header your application server includes in the response to the data pipelining request. You can override these headers by including a refreshInterval attribute in the <Content> tag as follows:
<Content view="profile"
         refreshInterval="86400"
         href="http://social-app-tutorial.appspot.com/static/hello.html">
</Content>
In this example, the attribute's value tells the container to cache the content from the given URL for one day (60*60*24 seconds). You may want to use a value of "0" while developing your app, but turning on caching in production has significant scaling and latency benefits. See the /wiki/spaces/a/pages/526878 for more ways to use the container's cache to your advantage.
Sending data to your application server
When the container renders the gadget shown above, it sends an HTTP GET request to the URL provided. Data pipelining allows you to specify social data to piggy-back on this HTTP request, using an HTTP POST with the social data included in the request body.
The following gadget sends the owner's information to a remote application server when it requests http://social-app-tutorial.appspot.com/profile. To use data pipelining, include <Require feature="opensocial-data"/> in your ModulePrefs and specify your data requests as child elements of a <Content> tag in the gadget XML file. In this case, just add a <os:OwnerRequest> tag to get the owner's user ID and name.
<?xml version="1.0" encoding="UTF-8"?>
<Module>
  <ModulePrefs title="Social Application Tutorial - Data Pipeline">
    <Require feature="opensocial-data"/>
  </ModulePrefs>
  <Content view="profile"
           href="http://social-app-tutorial.appspot.com/profile"
           authz="signed"
           xmlns:os="http://ns.opensocial.org/2008/markup">
    <os:OwnerRequest key="owner_info" fields="displayName"/>
  </Content>
</Module>
Notice the two new attributes in the <Content> tag. First, adding authz="signed" tells the container to add a digital signature to the request (signing and verifying requests is covered in the next section). Second, the xmlns:os attribute specifies the namespace for the data pipelining tag included in the in <Content> element.
Let's take a look at the data pipelining tag:
<os:OwnerRequest>
Specifies that you want the owner's information.
key="owner_info"
An arbitrary handle you assign, which is used as an identifier for this information when you process the request body on your server.
fields="displayName"
A comma-separated list of profile fields to include in the request body. You can also use '@all' to return all available fields.
Therefore, when the gadget above is requested, the container sends an HTTP request like the following:
POST /profile HTTP/1.1
Host: http://social-app-tutorial.appspot.com
Content-Type: application/json
[
 {"id":"owner_info",
  "data":{"id":"09952060504025502214",
          "displayName":"Lane LiaBraaten"
         }
 }
]
The server side code that handles requests to http://social-app-tutorial.appspot.com/profile parses the name out of the JSON in the request body and uses it to render a simple message. Here's a code snippet using Google App Engine to display a message about who owns the profile:
from django.utils import simplejson
from google.appengine.ext import webapp

class ViewServer(webapp.RequestHandler):
  def post(self):
    request_data = simplejson.loads(self.request.body)
    for element in request_data:
      if element['id'] == 'owner_info':
        displayName = element['data']['displayName']

    self.response.out.write("This profile belongs to <b>" + displayName + "</b>")
Basic request security
Signing data pipelining requests
Social apps often deal with people's personal information and if you want your app to be a success it's important to respect and protect this data. Since social applications communicate between several computers, you need a way to verify that an HTTP request is legitimate.
In this case, you need to verify that the requests coming into your application server are actually originating from the container you're working with. If you don't verify the origin of the request, you could be handing out personal data to anyone that sends an HTTP request to your application server.
A note on the profile view
Traditional social networks get billions of requests for profile page views every day. If your app is installed on even a small fraction of users' profile pages, your application server may quickly melt down from the large number of requests. However, if you make the profile view of your app only depend on the owner's information you can have the container cache your app's profile view for each owner (as opposed to caching for each owner/viewer combination).
The following gadget is similar to the first data pipelining example, but there are a few new attributes in the Content tag that tell the container to add a signature to the request it sends.
<?xml version="1.0" encoding="UTF-8"?>
<Module>
  <ModulePrefs title="Social Application Tutorial - Signed Data Pipeline">
    <Require feature="opensocial-data"/>
  </ModulePrefs>
  <Content view="profile"
           href="http://social-app-tutorial.appspot.com/profile"
           authz="signed"
           oauth_service_name="hmac"
           sign_viewer="false"
           refreshInterval="86400"
           xmlns:os="http://ns.opensocial.org/2008/markup">
    <os:OwnerRequest key="owner_info" fields="displayName"/>
  </Content>
</Module>
Let's take a look at each of these new attributes for the Content tag:
authz="signed"
This attribute tells the container to sign the request. This means that the container adds several URL parameters to the HTTP request, such as the name of the container, the ID of the app initiating the request, the ID of the current owner and viewer. To sign the request, the container takes all these parameters and applies an algorithm that creates a signature string based on this information, then adds this signature as another URL parameter.
oauth_service_name="hmac"
This attribute specifies the signing algorithm to use when generating the signature. Containers may support a public key method ("RSA-SHA1") and/or a private key method ("HMAC-SHA1"). Private key encryption is preferred because it's faster, but if you want to use HMAC, you need to register your app with the container to get a secret key to use in the signing process. (If you're using a Google container, you can register your app here.
sign_viewer="false"
By default, the viewer and owner IDs are included as URL parameters and used in the signing algorithm. This means that for each viewer who checks out the profile of someone with your app installed, the container will send a request to your application server. However, since profile views generally only include information about the profile's owner, you can omit the viewer ID. This way, the request for a user's profile is the same no matter who views it, allowing the profile view for a particular owner to be cached for all viewers.
Now when the data pipelining request is sent to your application server, it will look like this:
POST /profile?lang=en&country=US&oauth_body_hash=K5o%2F5ONqvpVfsUN0nxAOigDxbPc%3D&
opensocial_owner_id=09952060504025502214&opensocial_app_id=13667258392654792251&
opensocial_app_url=http%3A%2F%2Fsocial-app-tutorial.appspot.com%2Fstatic%2Fsigned_data_pipeline.xml&
opensocial_proxied_content=1&oauth_version=1.0&oauth_timestamp=1242226797&
oauth_consumer_key=498009589040&oauth_signature_method=HMAC-SHA1&oauth_nonce=1242226797254769000&
oauth_signature=N5Fi8bZtl08WXiI5UflhKxZEKUk%3D HTTP/1.1
Host: http://social-app-tutorial.appspot.com
Content-Type: application/json
[
 {"id":"owner_info",
  "data":{"id":"09952060504025502214",
          "displayName":"Lane LiaBraaten"
         }
 }
]
To learn more about signing and verifying requests, see the Introduction To Signed Requests
Verifying request signatures
OpenSocial uses OAuth parameter signing to create the signatures on requests. There are OAuth client libraries in many languages that you can use to help verify the requests your application server receives from a container.
The following code snippet modifies the request handler from before, adding a check to verify that the request's signature is valid before responding. To verify the signature, you perform the same parameter signing algorithm on your server and see if the signature string you build matches the signature in the request.
from django.utils import simplejson
from google.appengine.ext import webapp
import oauth

class ViewServer(webapp.RequestHandler):
  def post(self)
    if (self._isValidRequestSignature()):
      # handle the request
    else
      # don't respond to the request

  def _isValidRequestSignature(self):
    # Get the signature generated by the container
    oauth_signature = self.request.get('oauth_signature')

    # Make sure all the request parameters are properly encoded
    params = {}
    for key, value in self.request.params.mixed().items():
      params[key] = value.encode('utf-8', 'ignore')

    # Create an OAuth request based on the parameters
    oauth_request = oauth.OAuthRequest.from_request(self.request.method,
                                                    self.request.url,
                                                    params)

    # Create an OAuth consumer with your consumer key and secret
    consumer = oauth.OAuthConsumer('orkut.com:293816396467', '1SJkUHLEM4yPKo0E7W/N8SdU')

    # Use the OAuth request and consumer info to re-generate the signature
    signature_method = oauth.OAuthSignatureMethod_HMAC_SHA1()
    built_signature = signature_method.build_signature(oauth_request,
                                                       consumer,
                                                       None)
    # Return true if the re-generated signature matches the signature from the container
    return built_signature == oauth_signature
Note: I've used fake values for the OAuth consumer key and secret, but you can get an idea for what these values generally look like.
To learn more about signing and verifying requests, see the Introduction To Signed Requests